Bunney's Scare Crow
Tutorial
This tutorial was created in
PSP 7. I have used a couple outside filters, DBS Flux where you can download here.
You will also need Texture Filter which can be downloaded here.
The psd file that I used was a denim
you can find that here.
This tutorial also assumes you have basic knowledge of PSP using layers as well
as vectors;0)
Lets Begin
Open a new 500 by 600 (16.7
Million colors) transparent image. Go to layers and add a new raster layer, Name
this layer head. Using your preset shapes tool  and these settings

Your foreground (styles) color
should be #E3862B. Your background color should be #E7BEAA.

Now draw a circle using your ellipse preset shape. Make sure
you leave room at the top for his hat. Using your object selector tool  right
click on the inside of your head and go to node edit, Bring your bottom node
up to where its almost a line and your top node up just a bit like this
right
click on the inside of your head and go to node edit, Bring your bottom node
up to where its almost a line and your top node up just a bit like this
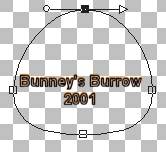
When you have your head set the way you want it right click on the inside of
his head again and go to quit node editing. Now go to layers convert to
raster .Change your foreground (styles) color to #E48F5B. Your background
color doesn't matter on this part. Using your magic wand

select
only your scarecrow head so that the marching ants are only around his head
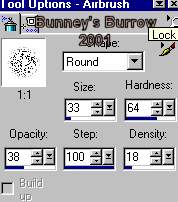
and not the entire picture, Take your airbrush tool

and
these settings
add a new raster layer before you spray just a little
color on your scarecrows head. The reason I added a new layer here was I
didn't want the entire head blurred on this next step I just wanted the color
blurred. After you have sprayed some color on your scarecrows head go to
effects, blur, gaussian blur and set this to 1.00.
Now we can merge visible these layers so go to layers, merge visible and
name this layer head. Add a new raster layer and name this layer hat. Change
your foreground (styles) color and your background color to black. Using
your preset shapes tool again only this time use these settings, Find your
triangle
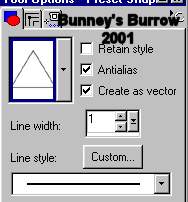
Draw a triangle on the top of your scarecrows head. Now using
your object selector tool
right
click on the inside of your hat and go to node edit, On your very top node
right click on the node and go to node type and chose symmetric.

This just brings it to a curve at the top. No need to do anything else to
this top node, going to your right side node again go to Node type, and
chose symmetric again, You will need to also pull this node in to where its
plush on your scarecrows head.
Do the same with the left node change it to symmetric. Now we need to add a
few nodes to the bottom of the hat so using your ctrl on your keyboard
and move your mouse on the bottom of your hat till you see the words add .
Add 3-4 nodes. Then using your mouse bring those nodes up to where they
curve around the scarecrows head.
You may have to move your arrows to accomplish this so that its plush to his
head. Now using the same method as above add two more nodes one on each side
of the scarecrows head and move those in to give the hat a little more
shape. Once you have your hat shaped the way you want it right click
again and go to quit node editing, then go to layers convert to raster. Mine
looks like this

There are a lot of steps involved when working with vectors
and as most of you know who have tried my tutorials I am one for detail LOL. I
got to have detail so bare with me LOL;))
Next we are going to add his face so go to page 2.

