Quackers
This tutorial was written
for PSP 7 But can easily be modified for PSP 6. This Tutorial uses Fantastic
Machines Paint Engine Filter,
and the Texture
Filter. Unzip these into
your psp plug-ins folder. The PDS file I used for Quackers hat can be
downloaded here.
Unzip it into your PDS files. This is optional.
Remember Save your work
Often!
Lets Begin
Open a new transparent image 500 by 500.
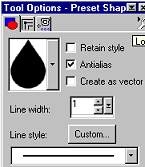
Add a new layer and name this layer body. Set your foreground color to a
dark gray I am using #808080 Set your background color to white. Using
your present shapes tool  Browse
to find the teardrop shape With these settings.
Browse
to find the teardrop shape With these settings.
Draw a teardrop on your image. Keep in mind this is the
ducks body, So make it as fat or as thin as you want the body to be.
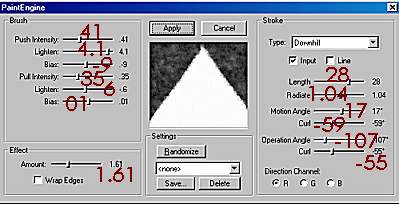
Next go to effects, plug in filters, fantastic machine, paint engine
and use these settings.
Now we are going to use the retouch tool  with
these settings
with
these settings
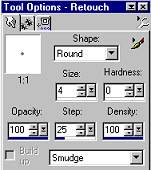
With short even strokes on your duck body on the outside
line pull with your mouse outwards, The shorter the strokes the shorter
the fur and same goes with the longer the strokes the longer the fur. Make
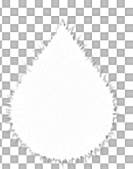
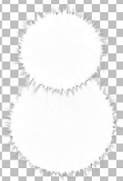
sure you just go around the outside lines of the body. Here is what mine
looks like. I have added a drop shadow to mine for demonstration
purposes.
Add a new layer and name this layer head. Using your
present shape tool locate the eclipse
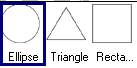
Use the same settings as we did on the teardrop shape.
Draw a shape for the face of the duck. We want to use the same filters
as we did on the body so go to effects, plug in filters, fantastic
machines paint engine and use the same settings for the head. We also
want to use the push brush again to pull the fur out like we did on the
body. Here is what you should have at this point
Kind of looks like a snowman doesn't it lol. Add a new
layer and name this layer wing, Going back to your present shape tool
this time we use the teardrop again only making sure create as vector is
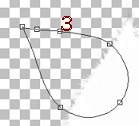
CHECKED. Draw a teardrop shape we are going to edit this node, go to
your object selector tool  and
right click inside your image and go to node edit, we want to rotate the
image to the left so that the point of the teardrop is now to the left
side like this
and
right click inside your image and go to node edit, we want to rotate the
image to the left so that the point of the teardrop is now to the left
side like this
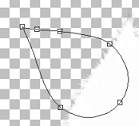
Now we want to add two nodes to the top side near the point of the
teardrop like this
To do this make sure you have clicked on node edit and
using your Ctrl key on your keyboard move your mouse until you see +add
and click to add your node. We are going to pull node number 3
Up and out like this
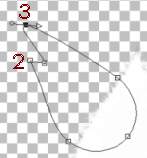
Pull node number 2 out to the left just a little to
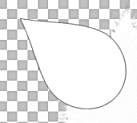
round it a bit. When you get your wing the way you want go to layers
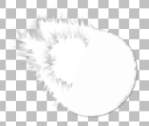
convert to raster. We are also going to use the plug in fantastic
machines paint engine using the same settings as before. We also want to
use the push brush again with same settings as before and pull upwards
and out all around the wing until you get what looks like feathers
similar to this. Yours will NOT have the inner wing at this point we are
adding this part next.
Now using your draw tool  Change
your background color to Null (off) , Your foreground color should still
be set at the Dark gray. Now just draw a semi circle in the center of
the wing like the image above. Using your push tool same settings
lightly go around the lines to pull the lines outward to give it the
feathery look. Keep in mind I have added drop shadows for demonstration
purposes. You can chose to add a drop shadow now or we will do that
later.
Change
your background color to Null (off) , Your foreground color should still
be set at the Dark gray. Now just draw a semi circle in the center of
the wing like the image above. Using your push tool same settings
lightly go around the lines to pull the lines outward to give it the
feathery look. Keep in mind I have added drop shadows for demonstration
purposes. You can chose to add a drop shadow now or we will do that
later.
Once you are happy with your wing, Go to edit copy, edit paste as new
layer, rename this layer wing 2. Then go to image mirror and place
this wing on the opposite side of the duck. Make sure you pull these TWO
layers beneath your body layer. Your layer palette should read from
bottom to top starting with layer 1, body, head, wing, and wing 2.
Add a new layer and name this layer feet.
Page 2
