|
Quackers Page 2
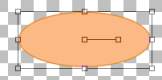
Change your foreground color to a dark orange, I am using #E38521 and your background color to a light orange I am using #FBBA85. Going back to your present shape tool browse back to your eclipse like we used on the ducks head, make sure your create as vector is CHECKED. Draw an oblong shape similar to this
Using your object selector tool right click on the inside of the image and
go to node edit, We are going to pull node number 4 in and up using your
arrows pull the node up . Pull node 1 out, Node 2 and 3 both get pulled out.
Your finished image should look similar to this one
Once you get your foot shaped the way you want it right click and go to quit
node editing. Convert this layer to raster. Using your draw tool again
( the pencil) your line width should be set at 1 . Keep your foreground
and background colors the same, We are going to cheat just a little on the
feet LOL. Now draw three lines to fill in for the toes this may take a
little practice as you will be drawing free hand. Hint: if you keep
your mouse button held down while you draw and make sure you only draw three
lines it works better then trying to draw each individual line. Here is what
you should have now. Mine has a texture to it, if you want a texture you can
go ahead and do that now.
Do you see the three lines I am talking about? Just start on the top
of the foot and ending up on the bottom, Now once you have your foot drawn
the way you want, go to edit copy, edit paste as new layer name this layer
right foot, Then Image mirror and place this foot on the right side of the
duck. Your duck should look similar to this one. Make sure you drag your
feet layers below your body layer also.
Yours will be larger and have more detail as this one is resized for download time.
Add a new layer and name this layer tail. Change your foreground color back to dark gray I am still using #808080 your background color needs to be changed back to white. Now using your present shape tool locate the teardrop like we did on the ducks body, create as vector does NOT need to be checked for the tail, draw a small teardrop shape for the tail, Use the retouch tool and pull the lines up and outward like we did on the body and head, Play around with it and use the same settings as we did before, Here is what my tail looks like
Mine shown here has a drop shadow applied already. Keep that in mind;0) Move this layer below the body layer but after the feet layer your layer palette should now read from bottom to top, layer 1, wing left, tail, wing right, foot left, foot right, body , head, Or something similar just make sure your tail and feet layer are beneath your body layers:))
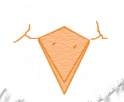
Now add a new layer and name this layer beak, Change your foreground color
back to the dark orange mine is #E38521 your background color should be the
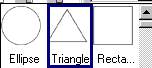
light orange mine is #FBBA85. Using your present shape tool only this time
we want to use the triangle
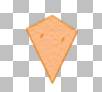
Create as vector should be CHECKED. Draw a small triangle and go image flip . Use your object selector tool and right click on your image and go to node edit, add a node in the middle of the triangle like this
Using Ctrl on your keyboard. Now just pull that node up similar to the image
above, when you get your node set the way you want it right click again and
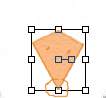
go to quit node editing. Go to layers convert to raster. I added a
texture to mine, Going back to your draw tool (pencil) draw two small dots
on the top of the beak. Your beak should now look like this
Now go to edit copy, edit paste as new layer move this one
directly on top of your other beak, now we want to use your deformation tool
We just want a smaller beak is what we are trying to accomplish. Now change
your background color to NULL (off) keep the dark orange as your foreground
color. Using your drawl tool draw a line on both sides of the
beaks, For cheeks and then two curve lines on top of the cheeks like
this
Now to add some eyes, Add a new layer, name this layer eye,
Change both foreground and background colors to black. Use your present shape
tool and using the eclipse again draw an oblong shape for the eye like this
Go to effects, plug ins filters, eye candy and add a glass effect.
If you don't have eye-candy filter, just add an inner bevel to the eye. Now
go to edit copy , edit paste as new layer and image mirror and place this
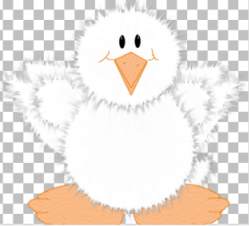
eye on the opposite side . Your duck should now look something like this
We are almost done, Add a new layer and quack on over to page 3. This Tutorial ©
Bunney's
Burrow 2001
|