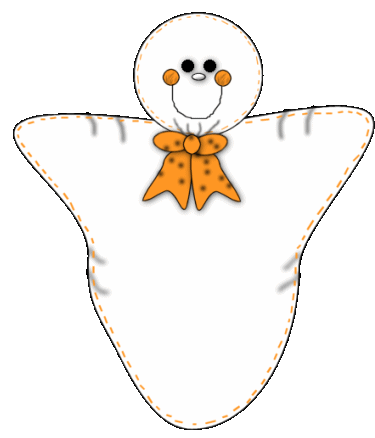
Bunney's Friendly Ghost
Tutorial
This tutorial was created using PSP 7 preset shapes. It
assumes you have working knowledge of using layers and working with vectors:))
Lets Begin
Open a new 500 by 600 transparent (16.7 Million Color) image.
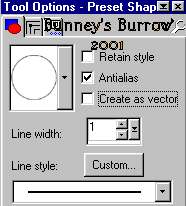
Go to layers, new raster layer and name this layer head. Using your preset
shapes tool  We
are going to be using the ellipse shape with these settings
We
are going to be using the ellipse shape with these settings
Your foreground (Styles) color should be black and your background color
should be white.

Draw a round circle toward the top of your image for his head.
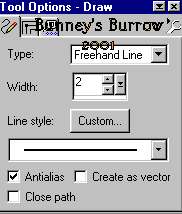
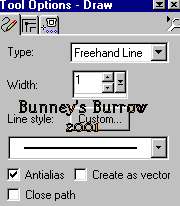
Now using your draw tool  change
your foreground (styles) color to an orange. I am using #FF9724. Your draw
tool settings are below
change
your foreground (styles) color to an orange. I am using #FF9724. Your draw
tool settings are below
Now to do this next part it is best if you zoom in by at least
1 (one) to see better what your doing:)) So go to view zoom in by 1. Now using
your draw tool we are going to add what I call stitches to our ghost, Just
draw small lines going all around his head like this.

To add our eyes, add a new layer and name this layer eyes.
Using your airbrush tool  change your foreground (styles) color back to black. And use these settings
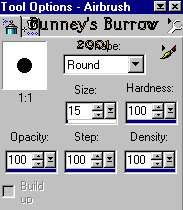
Now spray two eyes on your ghosts face. I added a drop shadow
using these settings

Your background color needs to be changed to the orange we
used for the ghosts stitches #FF9274. Your foreground color should be black.
Using your preset shapes tool and
the same settings as before . Add a new layer and name this layer cheeks,
Draw to round circles for his cheeks. Set them close to right under his
eyes, I also added Eye Candy 4000 Fur filter to his cheeks but that step is
optional. Add the same drop shadow to your cheeks as you did on the eyes.
Add another layer, no need to really name this layer but we are going to add
his mouth. Using your draw tool

With
these settings
Make sure before you draw a mouth your background color is set
to null like this

We are going to add the nose next. Add a new layer and name this layer nose.
Now using your preset shapes tool again, Change your background color back
to white. Using your preset shapes tool
and
once again your ellipse shape draw a small circle for the ghosts nose.
I used an inner bevel on my ghosts nose, Go to effects 3D effects, inner
bevel and use these settings

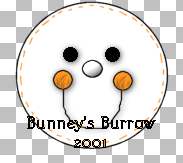
Add the same drop shadow to his nose as you did his eyes. This is what you
should have now.
Open your layer palette and place an x over layer 1 and merge
visible the remaining layers and name this layer Ghost Head.
Are you ready to go to his body now?? If so go to page 2. And
we will finish up:0)