|
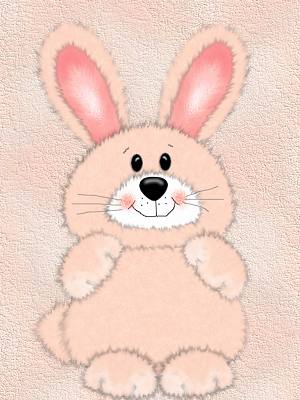
Fuzzy Bunny Tutorial Page 2
Add a new layer and name this layer nose features. We will be actually adding the nose lol. Your background and your foreground colors both should be black. Using your present shapes tool and the eclipse like we did with the bunny's head. Draw a small round circle similar to this one. Keep in mind this is the actual nose. So you don't want it too large.
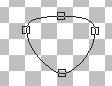
Use your object selector tool and right
click and go to node edit we need to shape this nose up a little. This time we
are going to pull the bottom node out like this
Then we need to pull the top node down to make the top flat like this
The side two nodes need to be pulled out to the sides like this
Once you get your nose set the way you want it. Right click and go to quit node editing. Then to layers convert to raster. Move the nose inside your white part of your nose like this. Yours will NOT have the mouth yet;))
Now while you are still on your actual
nose you need to add a new layer and using your draw tool
Your foreground color is now white and background
color is set to null what we are doing here is adding a small white line
across the nose. Draw a line across the top of the nose similar to this
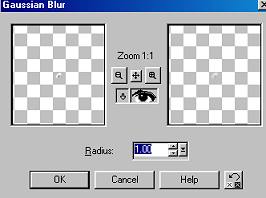
Don't worry we are going to add a gaussin blur to
blend it in thats why we added a new layer . Now go to effects, blur gaussin
blur and use these settings
We want to merge these two layers only. So go to your
layers palette and place an X on your body, head and the white nose , and
layer 1 and merge visible these two layers and rename this layer black nose.
Now to add the mouth. Add a new layer and name this
layer mouth. Using your draw tool
Make sure your background color is set to null and your foreground color is now set to black. Draw a straight line down from the point of the nose to and out to the sides curved like this and draw two slant straight lines at the top of the curved lines like this. Just use your imagination on the mouth:0)
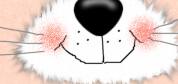
Add a new layer and name this layer cheeks. We use a lot of layers because if you don't like the way something is you can always go delete that layer and create a new layer. So you will be seeing me use a lot of layers LOL!
Spray a little round rosy cheeks on top of the slant
straight lines you just drew. Like this
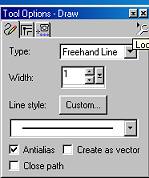
You will not have the whiskers yet. make sure you do both sides. When you are happy with your cheeks we want to use your draw tool again width set at 1 leave the other settings as we had them before change your foreground color to a light gray, I am using the same gray as we started out with #COCOCO . Now Draw 3 whiskers similar to the picture above. And while we are at it go ahead and draw the three small dots on each side like I have above. You can use the gray or black I used black.
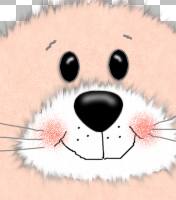
Now we want to add some eyes, Add a new
layer and name this layer eyes. Your foreground and background colors both
should be black now. Go to your present shapes tool you can UNCHECK create as
vector at this point as you will not need that for the eyes. We still want to
use the eclipse and draw a small oblong circle for the eye. Make sure its not
too large. Place this eye above the nose. And make sure this layer is at the
top of your layer palette. We want to add a new layer like we did for our nose
and using your line tool same settings change your foreground color to white
and background color to null. Draw a small white line like this
Now we want to copy and paste this eye, So go to edit
copy edit paste as new layer and image mirror and place this eye on the
opposite side of the nose like this
I have added a drop shadow to my eyes. That's totally optional . While you are on your eyes go ahead and change your foreground color to the gray #COCOCO or whichever gray you chose and draw two small eyebrows at the top of the eyes like this
Really starting to take shape now huh?
LOL. Add a new layer and name this layer ears. And then go to page 3:0) This Tutorial ©
Bunney's
Burrow 2001
|