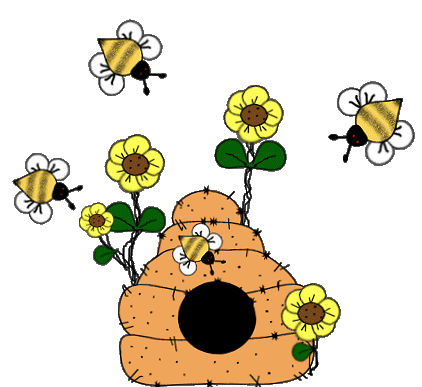
Bumble Bee Boogie
This is a simple yet
fun tutorial to learn how to create the bees, sunflowers and the beehive. I
hope you enjoy this tutorial as much as I have creating it! This
Tutorial was created in PSP 7, But can be modified in PSP 6. You will have
to have the knowledge of using vectors to create the shapes we used here.
Lets Begin
Open a new transparent image
500 by 500. Add a new layer and name this layer bee. You need to set your
colors on your color palette. Foreground color should be black and
background color should be the color you want your bee to be. I have
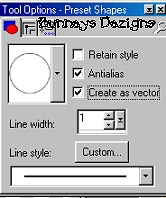
chosen #F6D058. Now using your present shapes tool  .
Browse to you teardrop
.
Browse to you teardrop
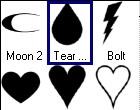
Use these settings.
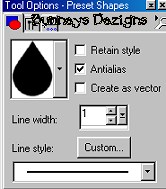
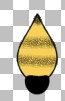
Draw a small teardrop shape. Now
using your magic wand select only your teardrop bee shape. You may have to
go to selections invert to get the marching ants ONLY around your
teardrop. Now using your airbrush tool  and
these settings
and
these settings
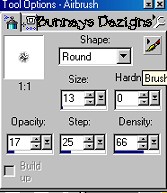
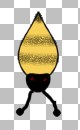
Now Draw your bee some
lines similar to this paying particular attention to the stinger

Now You want to add a head.
Add a new layer and name this layer head. Using your present shapes tool
again we want to use your eclipse make sure create as vector is checked!!
Change your background
color to black. So that both foreground and background are black! Draw a
small circle keeping in mind this is going to be the bees head so it needs
to be fairly small. Using your object selector tool  right
click on the inside of your head . And go down to node edit we will be
editing this just a small bit. Bring the bottom node up just a tad bit
like this
right
click on the inside of your head . And go down to node edit we will be
editing this just a small bit. Bring the bottom node up just a tad bit
like this

And right click again and
go to quite node editing. Now go to layers convert to raster. Now
depending upon where you bee is located you may have to flip your head or
rotate it.. What we need to accomplish here is getting the head on top of
the body like this.
Now he needs some eyes. I just used my
draw tool  I
used the color red as my foreground background doesn't really matter at
this point.. You can barley see the eyes anyway on my example but draw two
small dots for the eyes.. I changed the width of my line to 3.
I
used the color red as my foreground background doesn't really matter at
this point.. You can barley see the eyes anyway on my example but draw two
small dots for the eyes.. I changed the width of my line to 3.
Add a new layer and name this layer
feelers. Using your draw tool once again I used the same width and just
changed my foreground color back to black and made my background color
black. And then I drew two small feelers at the top of the bees head. To
get the little dots like I did, I went back to my present shapes tool and
chose the eclipse as we did with the head. You can UNCHECK vectors
at this point as you wont be needing them here. Draw two small circles for
both the feelers like shown here .
Add a new layer and name
this layer wings. Your foreground color should stay at black, but we
need to change our background color to white. We need to go back and make
sure we CHECK Create as vectors for our wings. We will be using our
teardrop like we did for our bees body. Draw a small teardrop and rotate
it as necessary .. To Rotate it while you are in your vectors if you move
your mouse over the inside node until you get a circular arrow then you
can rotate it in any direction. Go to layers convert to raster. Once you
get your wing placed where you want it. We want to now go back to our draw
tool and draw some black lines on the inside of our wing. Make sure you
change your width back to 1 or it will be too large! You background color
needs to be null at this point also. Now just draw a line or two on the
inside of your wing similar to this

Now go to edit copy and
edit paste as new layer. I am placing these all on a new layer so that if
you need to change the rotation you can do it on each individual layer.
You will need to rotate this one to place below the one you just created.
To rotate the next 3 wings I have chosen to use my deformation tool  .
We are not going to deform it but just use the little arrows as we did
before and rotate it to where you want your wings positioned. Continue
doing this until you have 4 wings total. Two of your wings will have to be
mirrored and placed on the opposite sides of the bee. So go to image
mirror. And mirror your wings.
.
We are not going to deform it but just use the little arrows as we did
before and rotate it to where you want your wings positioned. Continue
doing this until you have 4 wings total. Two of your wings will have to be
mirrored and placed on the opposite sides of the bee. So go to image
mirror. And mirror your wings.
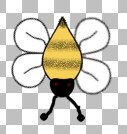
Your bee should look
similar to this one at this point!
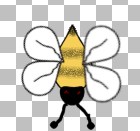
Now make sure you have your
wings placed exactly where you want them and go to your layers palette and
place an X on layers 1, head, body, and feelers like this
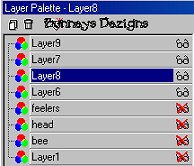
Merge visible the rest of your layers
which should be for your wings And rename this layer wings. Pull the
wings layer all the way to the bottom behind the body layer. You now
have a bee. I went ahead and merged all my layers at this point
excluding layer 1 so that I could move my bee without it falling apart
on me for the rest of my scene. You can do that now if you wish!
Now if you would like to
make the flowers and the beehive please go to the next page.
Page 2