|
Bunney's Christmas Mouse
Using your preset shapes tool
Change your background color back to the same
color you are using for your mouse, I am using #EEDBCC. Draw a circle for his
ear, I made mine rather large because I wanted him to have big ears LOL.
Don't worry about it being on top of your hat
and mouse we are going to move that later. Using your object selector tool
right click on the inside of your ear and go to node edit, then pull node 1
up and out like this
When your done shaping your ear right click again on the inside of your ear and go to quit node editing, then go to layers convert to raster and name this layer ear. Move this layer all the way to the bottom on your layer palette like this
Using your magic wand
Spray along the edges of your marching ants
like this
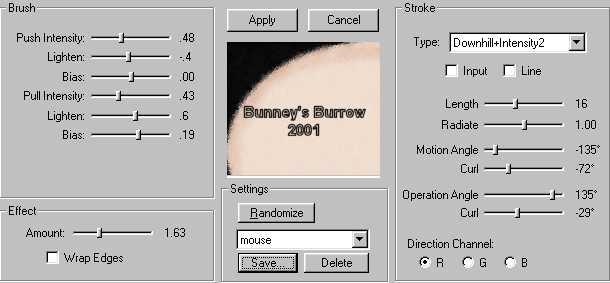
Now go to effects, plug-in filters, fantastic
machines paint engine and use these settings
Use your retouch tool
Use the same effect we used earlier on his head pulling outward. This is what you should have now.
Now go to edit copy, edit paste as a new
selection then image mirror and place on the other side of your
mouse's head go to selections select none. For the insides of the ear we are
going to do the exact same steps we just did for the outer ear only change
your foreground color to #FF8080 your background color needs to be #F7F0EB.
Draw an ellipse vector shape (create as vector is CHECKED) similar to your
outer ear only smaller like this
Then go to layers convert to raster, name this layer innerear, Use the same fantastic machines, paint engine filter we used on the ear. Use your retouch tool also as we did on the outer ear. Pulling up and outwards. This is what you should have.
After you get your inner ear the way you want
it go to edit copy, edit paste as a new selection then image mirror and
place on the other ear like this
Add a new raster layer and name this layer
body. Change your foreground color back to the black, your background color
should be the same color you used for your mouse, I am using #EEDBCC
Using your preset shapes tool
Draw a teardrop shape for your body,
something like this
This picture shows the fantastic filters paint engine already applied and the retouch tool already applied. so using your magic wand select your body and make sure that the body is the ONLY thing selected, you may have to go to selections invert, then go to selections, modify contract by 2 (two) then use your fantastic machines paint engine filter same settings as used thru out the entire tutorial. Then use your retouch tool and pull the sides out like we did previously. The image above is what you should have.
Using your preset shapes tool once again this
time we need to use our ellipse (circle) shape. Same colors as we used on
the body. Create as vector should be checked this time.
The little boxes in the middle if you will move your mouse over one of those till you see the curve arrows you can rotate it to the left like this
Now go to layers convert to
raster and name this layer foot. Using your magic wand select your paw so that
the marching ants are around ONLY the paw. You may have to go to selections
invert. Then go to selections modify, contract by 2 (two). Then using your
airbrush tool
And spray the outer edges like we did before on his body, head and ears. Apply the same fantastic machines paint engine filter using same settings, Then using your retouch tool same settings as before pull the fuzz outwards. This is what you have now.
Now go to edit copy, edit paste as a new
selection , then image mirror and place on the opposite side of your mouse.
Your mouse should look similar to this
We are slowly getting there so don't give up on me now;)) Lets finish this little guy up by going to Page 5. This Tutorial ©
Bunney's Burrow 2001
|


