|
Bunney's Teddy Bear Tutorial
This tutorial was written for PSP 7 But can be modified for PSP 6 However, you will have to have basic knowledge of working with vectors to create the present shapes used in this tutorial. I hope you enjoy this tutorial as much as I have creating it.
Lets Begin
Open a new 500 by 500 transparent
image. Add a new layer and name this layer body. Your foreground color should
be set on black and your background color should be a color you have chosen
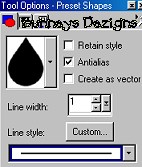
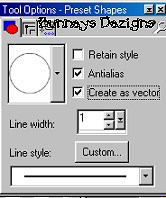
for your teddy bear I am using #784F14. Using your present shapes tool
Use these settings
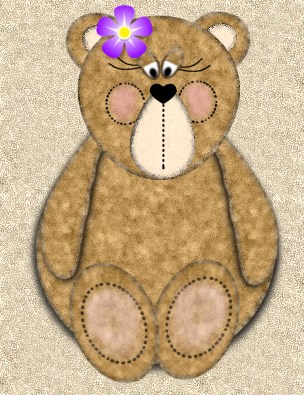
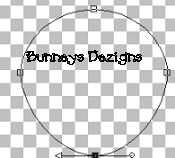
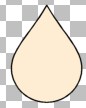
Draw a teardrop for the body of your bear. I made mine a little on the plump side lol. But its really your choice for the size of yours! Use your imagination! Here is what mine looks like
Yours will be much larger and have more
detail and wont have the fuzzies yet, We will be adding that next. We are
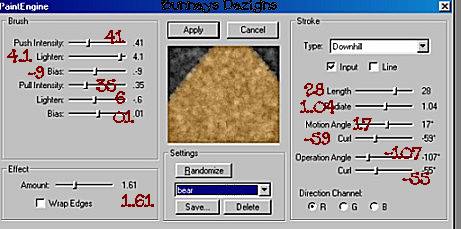
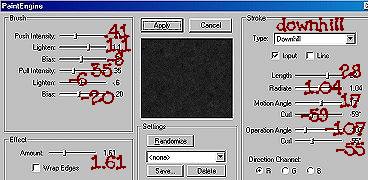
going to use Fantastic Machines Paint Engine which can be downloaded here.
Unzip and install into your PSP plug-in folder. Now go to effects, plug in
filters, fantastic machines, paint engine and use these settings
Add a new layer and name this layer head.
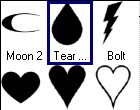
Going back to present shapes tools browse to find your eclipse shape
Make sure create as vector is CHECKED! We are
going to edit the head just a little. Use your object selector tool
When you are happy with the shape of your head go to quit node editing. Go to layers convert to raster. We want to add the same fuzzy to our head layer as we did our body so go to effects, plug in filters, fantastic machine, paint engine. And apply the same settings.
Next we want to add some eyes. Add a new layer and name this layer eyes. Use your present shape tool with create as vector UNCHECKED using the eclipse as we did on our bears head. Now draw a small eclipse shape for the eye of the teddy bear like this
Using your selection tool
Use your magic wand
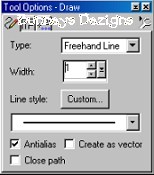
Now going back to your effects, plug in
filters, fantastic machines, paint engine use the same settings on the top
eyelid as we did the bears body and head. Go to selections, select none.
Using your selection tool again draw a square of marching ants around the
bottom half of the eye, click with your magic wand in the bottom half and go
to selections modify by 2 and flood fill this bottom part with white. Use
your present shape once again draw a small circle for the actual eye.
Your eye should look similar to this one.
You can rotate it and place it
where you want it on your teddy bear head. To rotate it you can use your
deformation tool
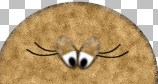
We need another eye, so go to edit copy, edit paste as new layer and image mirror and place this eye on the opposite side of the bear head . This is what you should now have
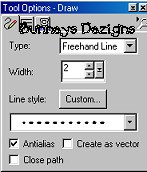
Use your draw tool
Draw you a couple eyelashes for
the eyes, Use your imagination on this one;))
Add a new layer and name this layer nose. Use
your present shape tool and choose the teardrop present shape with same
settings only making sure create as vector is NOT CHECKED. Change your
background color to a lighter beige or cream I am using #FFEDD3. Draw
a teardrop shape for the nose like this
We want to add some fuzzies to the nose. Go
to effects, plug in filters, fantastic machine, paint engine and use these
settings. Note we have changed the settings for the nose.
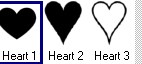
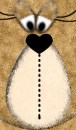
Change your background color to black, your
foreground color should now be black also. Using your present shape tool
browse to find your heart # 1
Add a new layer and draw a
small heart shape on the top of your beige nose like this
Make sure you change your line to #8 Dot. Now
just draw a straight line from the top of the nose down to almost the bottom
of the cream nose like this
We will be adding some color to his cheeks so go to page 2. This Tutorial ©
Bunney's
Burrow 2001
|