|
Bunney's Santa Bear Tutorial Page 4
Open your layer palette and
highlight your head layer, Using your preset shapes tool once again using the
ellipse shape (circle) create as vector IS checked. Your colors both foreground
(styles) and background colors should be black. Draw a circle for his mouth,
using your object selector tool
I really had to just play around to get the shape I wanted with this, this picture also shows the dimple marks yours will not have that yet:)) Once you have your mouth shaped the way you want it right click on the inside and go to quit node editing, then go to layers, convert to raster and name this layer mouth.
Going back to your draw tool, same settings as before, foreground set to black, draw dimples on both sides of the mouth. Your bear should now look similar to this
Change your background color to a light pink for his tongue, I am using #E88A8C. Add a new raster layer and name this layer tongue Use your preset shapes tool same settings only you can UNCHECK create as vector. Draw an oval shape for his tongue and take your draw tool and draw a black line in the center like this
Now all that's left is the vest and the bow tie:)) Going back to your preset shapes tool once again, This time we are going to use the rectangle shape again, Create as vector IS checked. Change your background to a pattern fill of your choice, (I am using a gradient fill, Sorry I cant offer that for download as I am not sure where it came from. When I get that information and the ok to use it with this tutorial I will upload it at that point, Until then Sorry. ) But chose a pattern or a gradient of your choice for your background color. Your foreground (styles) color should still be set at black.
Draw a rectangle covering most of your bears
body and arms, not to large, using your object selector tool right click
and go to node edit, we need to add a couple nodes so using your ctrl on your
keyboard move your mouse over till you see the words add at the bottom of your
rectangle we want to add 3 nodes evenly at the bottom of the rectangle
Pull nodes 2 and 4 directly up like this
Once you have your vest the way you want it, right click and go to quit node editing then to layers convert to raster and rename this layer vest. Open your layer palette up and drag this layer below your leg layer so that its under the arms and head this is what you should have
Change your background color back
to black. Using your preset shapes tool create as vector NOT checked and add a
new raster layer, draw 3-4 small buttons going down the front of his vest, I
also added a small drop shadow to the buttons. That's up to you;))
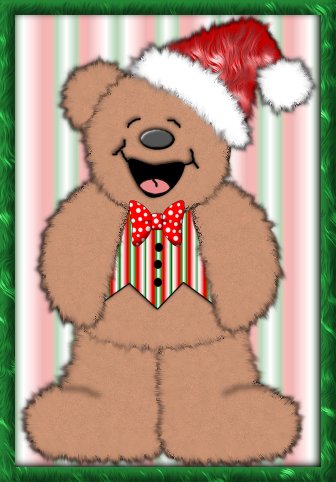
You are now done:0) You can merge visible all layers and export this as a tube if you wish:)) That wasn't bad was it? LOL. I hope you enjoyed this tutorial as much as I have creating it. If something isn't clear or I have left something out please don't hesitate to emaill me at kitchel@webworkz.com and I will answer all email as soon as possible. While you are here why not try some of my other tutorials?
This Tutorial ©
Bunney's Burrow 2001
|