|

Bunney's All
American Heart Tutorial 
This
tutorial was written in PSP 7. You will need to download my
heart selections files
here. Unzip these into your selection
folder in psp, if you do not have one create one now. You will
also need VM Natural Filter which can be downloaded
here. I
also used Eyecandy 4000. You can find a trial version
here.
The Dragonfly sinedot filter can be downloaded
here. You will
need sinedot 1, it will not work with sinedot version 2. My
star tubes can be downloaded
here.
The actual technique used for the heart I learned from doing a
fabulous American Flag tutorial. Please check it out while you
are
here!
You'll be glad you did. Jarah is a very talented lady and has
been awesome in helping me out with testing some tutorials for
me. Thank you Jarah!
Lets
Begin
Open a new 500 by
500 (16.7 Million colors) transparent image. Add a new raster
layer and name this layer heart. Go to selections, load from
disk and choose the heart.sel file. Your background color needs
to be white, your foreground color needs to be black

Flood fill
your heart with black, then go to selections modify contract by
2 and flood fill with white. Go to selections select none. Add a
new raster layer and name this layer red stripes. Change your
background color to a dark red. I am using #732521. Go to
selections load from disk and locate your redstripes.sel file.
Click open. Now flood fill this selection with the dark red.
This is what you should have. 
With
the marching ants still around your heart go to effects, 3D
effects, inner bevel and use these settings 
Now
go to selections invert (very important) then highlight your
heart layer. Your marching ants should be around the image and
your heart, make sure you are on your heart layer otherwise this
part will not work! Apply the same inner bevel used above. This
is what you should have. 
Now
go to selections, select none. Click back on your redstripes layer.
Add a new raster layer and name this layer blue. Go to
selections, load from disk and choose your blue.sel file. Click
open . Change your background color to a dark blue, I am using #000080.
Flood fill your blue.sel with the dark blue. Add the same inner
bevel as we used on the heart and stripes. This is what you
should have. 
Add
a new layer and name this layer stars. Open your white star psp
file that you downloaded earlier. You can export this as a tube
by going to file, export tube. Name this tube white star. Now
using your picture tube tool  locate your white star tube, I changed my settings for this
tutorial to these.
locate your white star tube, I changed my settings for this
tutorial to these. 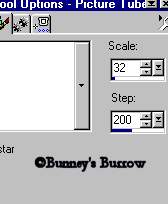
You
can change the scale to whatever you want, these are just guide
lines that I used for this tutorial. Now use your picture tube
place stars on the blue part of your heart like this. 
Using
the same inner bevel as we used before. Your heart should now
look similar to this. 
That's
it for the heart. Merge visible all layers and rename this layer
heart. Go on to page 3 to add the frame. Page
3

Tutorial Written by Bunney Copyright
©Bunney's Burrow
2001.
|